
Intake and Exhaust Valves
This is Lesson Two from an Eight part series. In Lesson One, we covered the cleaning and disassembly of the cylinder head. In this lesson, we are all about the intake and exhaust valves.
When the valves first come out of the heads they are very crusty. There can be a lot of carbon built up on the valves. We will show you our cleaning methods and then we move on to measurement. If any of the intake or exhaust valves make it past the measurement stage we then move onto dressing the valves.

Cleaning the Intake and Exhaust Valves
Before we can perform an inspection of all of the intake and exhaust valves, they will need to be cleaned. For us, this is a two-step process. The first step is to use the wire wheel to clean off the majority of the carbon. Once we have removed the majority of the carbon it’s into the blast cabinet. In the wet blast cabinet, we can remove the last of the carbon and give an overall clean. Get out your readers, because next it is onto inspection.
Visual inspection
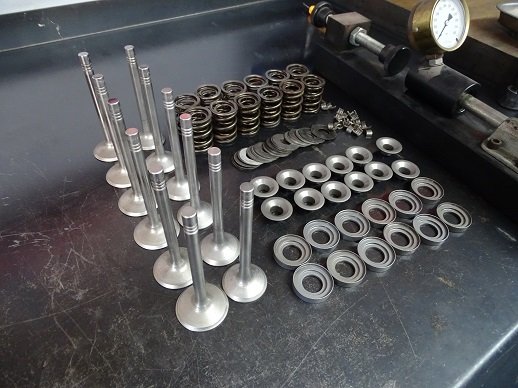
With all of the intake and exhaust valves cleaned it is time to begin with a visual inspection. Inspect each valve for obvious signs of heavy scoring/galling on the valve stem area. Next, inspect the area of the stem just above the head of the valve. If there are any signs of corrosion or pitting, then the valve should be replaced. This is especially important with sodium-filled valves as it can cause the head of the valve to break off. Lastly inspect the collet area for excess wear or damage. The valve collets should fit tightly into the valve with minimal movement.

Measuring your Intake and Exhaust Valves
Valves that have passed the visual inspection should now move onto to the measurement phase. Measure the valve stem in three different locations, top, middle, and bottom of the usable range. Valves are considered unusable if the stem measures 0.01 mm below its minimum specification. Valves that have a taper to the valve stem of 0.03 mm or more should not be reused.
Valve Face Dressing
Using a valve grinding machine, we are going to re-surface the valve face and the stem tips. Follow the instructions for setting up your specific machine regarding calibration. Make sure to dress the stones before you begin cutting.
On both the intake and exhaust valves, the valve face should be re-surfaced on a 45° angle. With the valve rotating in the valve grinder, check for any signs of runout indicating that the valve is bent. You will see a bent valve very clearly when it spins.
When grinding the valve take small cuts just until the wear is no longer visible on the valve face. Take care when grinding valves so as not to hit the valve stem with the grinding wheel. Replace any valves with damaged stems.

Valve Stem Dressing
Once you have machined the valve face, then re-finished the back of the valve stem. Take as small amount as possible just to clean up any wear that may be present. Excess cutting of either the stem or the face will mean the valve needs to be discarded.
After the intake and exhaust valves have been re-surfaced, they will need to be re-inspected. Measure the margin portion of the valves. Replace the valve if the margin is reduced in size by 30%. A valve with an undersized margin is more susceptible to burning while in service.

Checking Installed Height
The last measurement to check is the installed height of the valve. Install the machined valve into the cylinder head and measure the amount of valve stem protruding from the back of the head. The installed height should be 47.50 mm +/- 0.60 mm. Using a new valve as a reference compare the difference in height.
Intake and Exhaust Valves in Summary
The valves in the 911 air-cooled engines tend to suffer a lot of wear. Rarely will I re-use valves when rebuilding an engine. It is up to you to weigh out the pros and cons of spending the time on your existing valves. It takes a lot of time to clean, refinish, and reinspect the valves only to find that they are outside of the factory tolerance versus the cost of buying new valves.
Tools you may need


Ready for Lesson Three.
How to rebuild the 911 Cylinder Head, Valve Springs.
In the next part of our series on the air-cooled 911 Cylinder Head, we cover the valve springs. This is a short lesson on how to test the springs.

3 thoughts on “How to rebuild a 911 Cylinder Head. Lesson 2, Intake and Exhaust Valves”
Great information. Thanks for sharing with the community.
The quality of this series of videos is solid gold, I have seen nothing that comes near to matching them…… they are a work of art.
Thank you David for the kind words. We work hard on the lessons and appreciate the feedback.
Comments are closed.