

Rebuilding the 911 Cylinder Head, Lesson one
Disassembly and Cleaning
In this 8 part series, we are going to cover every aspect of rebuilding the 911 Cylinder Head. We are working on a 2.0Liter cylinder head, and a 2.7Liter, but the technique is the same up to the water-cooled engine. So we will cover the 911 cylinder head from 1965 to 1998. The 993 was the end of the Air-cooled Era.
We will show you all of the work involved step by step. Some of the work uses specialized machinery. If you do not have this available to use then you will most likely be sending the cylinder heads out to a machine shop. A machine shop will have even more specialized tools than we do for the cylinder head. So, even if you do send out your cylinder heads for work, you will have a complete understanding of the process from this series.
Disassembling the Cylinder Head
There is one distinct difference between the early 2.0L cylinder heads and the later (1970-89) model cylinder heads. That difference is the cylinder head gasket sealing area. The early 2.0L , (1965-69 911 models and 1970-71 914/6 models), use a composite style of head gasket. This type of head gasket sits directly against the cylinder head and the cylinder studs will pass through the gasket.
The later style cylinder heads use a recessed sealing surface and use a “CE” type sealing ring. Of course, when you get into the larger capacity engines the ports and valves will be bigger. Other than differences in valve sizes all operations and procedures are the same. So the only difference will be when machining the head gasket sealing surface on the early 2.0Liter cylinder head.

Initial Cleaning
With the cylinder heads removed from the engine the first step is to wash the head assemblies. This should be just a quick operation to remove as much of the engine oil and grease as possible so that the heads can be disassembled. Do not worry about the carbon at this stage. You just need the big chunks off so you do not get as dirty as the heads taking them apart. After the initial cleaning, take your cylinder heads to the workbench where you can start taking them apart.
Disassembly
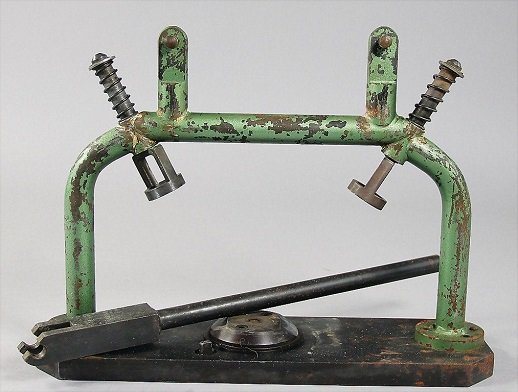
With the cylinder heads cleaned it is time to remove the valves and springs. There are many different types of valve spring compressors you can use. Porsche has a special tool for the job. The Porsche tool number is P-200 and this tool was what the factory used to compress the springs. Nowadays there are not too many of these manual tools floating around. We have progressed to a “C” type air-powered spring compressor. Whichever way you choose to do the job is up to you. We have no problem dissembling the cylinder head with the air-powered tool.
Using a “C” type valve spring compressor, compress the valve spring and remove the collets. Release the compressor and withdraw the valve spring, spring seat, and retainer. Next remove the valve stem seal and the valve spring shims. Before removing the valve, lift it just off the seat and “rock” the valve to feel for valve guide wear. Repeat for all valves and springs.

All of the valve springs are the same, so it is not necessary to keep them with their respective head or valve. Because the heads will be completely serviced it is also not necessary to keep the valves in a specific order. The only time that the valves would have to be kept in a specific order would if the head were not being serviced. If this is the case, then the valves would need to be kept with the head they came from.

Re-wash and Blasting
With the heads completely disassembled all parts need to be washed again. This is because now the heads are apart, we can reach all the areas where oil and grease could be trapped. After washing move the aluminum heads into the blast cabinet to remove all signs of carbon and other burnt on debris. Even if you use a wet or a dry blast cabinet, all of the grease needs to be removed. Any grease in the blast cabinet will contaminate the media. We have developed our in house process over time and once you go “wet”, you never go back. The dry media blast leaves a coarse finish and spending hours in the dusty atmosphere never felt good fo your health. So the wet blaster is a great improvement.
After blasting the cylinder heads are tumbled in a ceramic polisher. Not every shop is going to have a ceramic polisher. So the benefits of the wet ceramic polisher are that it closes the pores of the aluminum after the blast process and washes out any remaining blast media. Lastly, it puts a shine on the cylinder head surface that is hard to beat. Once the heads are removed from the polisher, they are rinsed off using hot water and then air-dried with compressed air.
Ready for Lesson Two,
How to rebuild the 911 Cylinder Head, Valves
You now have the cylinder heads and all the parts ready for lesson two. In this next lesson, we concentrate on the valves, cleaning them, measuring them, and re-cutting the back of the valve.
